For Mother’s Day this year, I decided to create some book page art for my mom’s room (the one at our house, since she basically lives with us half the time). I was pleasantly surprised by how easy it was and how fantastic it turned out, and I thought it would be fun to share it with all of you. I hope this inspires you to add a little bookish art to your life!
Step 1: Procure and remove book pages
I sometimes save old books that are too battered to display nicely so that I can use the pages for bookish projects.
- Since I wanted two different sizes for these pictures, I used some old paperbacks of two different Little House on the Prairie books and an old mass market paperback copy of Dune since mass-market pages are smaller than the standard size—you’ll also notice (in the pic in Step 3) that the margins are a lot smaller, so it mixes up the look a little.
- I liked the fact that these old pages have some yellowing to them because it makes the artwork look more interesting.
- I found that the easiest way to remove the pages was to break the spine completely and then rip them out. I liked the ripped look along one edge of the Dune book, but you can also cut the edge of the page if it won’t rip out smoothly enough or if you’re not a fan of the look.
- You could also use bigger picture book pages that only have words.
Step 2: Find images (and edit, if necessary)
You can search free stock image sites like Pixabay or Freepik. I really wanted book-related vectors or illustrations (not photos), but photos might work too. I actually ended up signing up for one month free of Adobe Stock because I wasn’t finding exactly what I was looking for on the free sites. My one-month free subscription got me 10 free images for non-commercial use.
- You might need to experiment with some different images to see what works well.
- I personally really liked the look of colorful images.
- Images with no background (or a white background) work best, but I was able to use one with a background by using Photoshop to fade it out or remove it completely.
Original image vs. my edited version (faded background):
- You can also use text, but be aware that getting the text to look nice over the book print can be a little tricky. I did one with text and ended up making the text bigger to help. (I also tried adding a little bit of a faded blue background at like 50% opacity to make it stand out more). That one was our least favorite of the bunch.
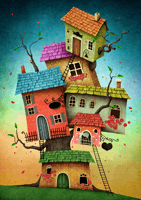
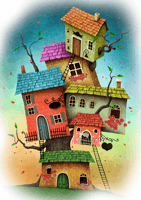
- Watercolor-type images didn’t work out very well for me. They seemed like they’d be really pretty, but they ended up looking like parts of it just didn’t print or got hidden by the text (when it was actually just parts of the picture that naturally faded out).
Here’s an example of an image I tried to use that didn’t work. The cool faded areas and unfinished lines looked like a mistake once it was printed on a book page:
Step 3: Attach book pages to cardstock
In order for the pages to go smoothly through the printer, you need to attach them to a thicker piece of paper like cardstock. I preferred putting two book pages on a page because it was a little easier to line up that way and I could do two tests at once.
- Attach the pages with double-sided tape or a glue stick. I ended up using a glue stick.
- You can either leave the pages on the cardstock once they’re done and cut out around them or you can remove them. (My daughter liked hers off the cardstock so she could curl up the edges a bit and show that it’s a real book page. I left my mom’s on the cardstock and cut around it.) If you’re going to remove them, only use a small amount of glue in the corners.
- You’ll probably need to do at least one test run to get proper placement. If you have a particular book page that you think would be perfect, don’t start out with that one!
- You can also just print one picture per page, in which case it will print right in the middle of the page, so you have to make sure you get your book page properly centered.
Here’s an example of how I ended up placing two pages on the cardstock so that the images printed out exactly where I wanted them. (You can see that the bird ended up further left, so I had to move the sheet over to adjust—this was true for me for all the right-hand pictures):

Step 3: Print
- If you want to print one picture right in the middle of the page, you should be all set. Just choose a 4×6 image size and print!
- If you want two images per page, change your printer settings accordingly, still choosing the 4×6 size.
This is how the printer dialogue looked in Photoshop Elements so I could print two pictures side-by-side (I had to first choose “Picture Package” in the original print dialogue and it brought me to this one). Depending on the program you use, this could look different for you.

Step 3: Enjoy!
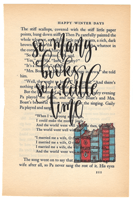
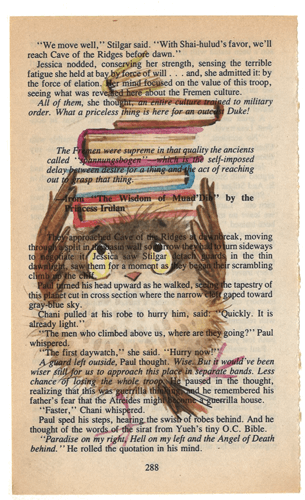
I was thrilled with how amazing these turned out just using my color laser printer. Here’s a larger scan of one of the pages so you can see it really well:
And then I framed them. I had to use 8 x 8 frames for the larger pages and I used 5 x 7 frames for the smaller ones. I left the decorative paper behind the pages because it looks like woodgrain, but I might switch it out for plain white at some point. (These pictures aren’t as great because of the glass in the frame, but you can still see how pretty they are.)


And here’s the final look on the wall:


I love using old books for crafts, but I’ve never made any of these. You did a great job and they look fantastic! I love how they look all framed and on the wall.
-Lauren
I’m definitely planning to do other book art as well. I had so much fun with these!
Those are really great! And it’s a great re-purposing of books that have started falling apart, too.
Yes! I love being able to use a book that would go in the recycle bin otherwise!
I love my book art pictures!! They turned out great and look so good on my wall! Thanks for the great Mother’s Day gift!
Glad you love your presents!! 🙂
These look really great! Thanks for the tutorial. I might try it 🙂
I hope you have fun with it!
Really neat, thanks for sharing
Thanks for stopping by!
These are beautiful, Nicole! Thanks for the tutorial
Thanks! I really enjoyed making them!
Nicole, these are SO pretty! What a wonderful idea! Thanks for sharing the process with us!
They turned out so great and look so fun in the room! Now I have to try another project!
I have never heard of this before! I am definitely bookmarking this because I need to try it out! It’s so cool! I’m gonna have to find some old books first… lol. I love how yours are turning out though!
I’ll bet if you ask around, someone will have some old books. They’re everywhere!
These turned out amazing, Nicole! What a creative way to add a bookish bit of decor to a room.
Thank you! I agree that they look great in the room!!
I’ve never even thought to do this, but it looks really cool, and yours came out so nice!
Love it! Now I’m lusting after a color laser printer …
What a great idea. I love how they came out.
Such a great idea! I want to try this some day. Now to decide what I’d want to do. Thanks for sharing this!
[…] Nicole @ Feed Your Fiction Addiction explains how to make book page art […]
[…] Time for the Cybils Awards: I’m a Round 1 Poetry Judge! How to Create Book Page Art. (And a Peek at Mine!) The Joys of Verse Novels, Graphic Novels and Other Very Quick Reads. Let’s Discuss! Balancing […]
Oops 😬 I didn’t completely understand how to get the image onto the book page! 🥲 my husband said he can help me!